
Friday, February 28, 2014
Lots and Lots of Candles
Thursday, February 27, 2014
Hello...

Monday, February 24, 2014
Laughter is the Shortest Distance
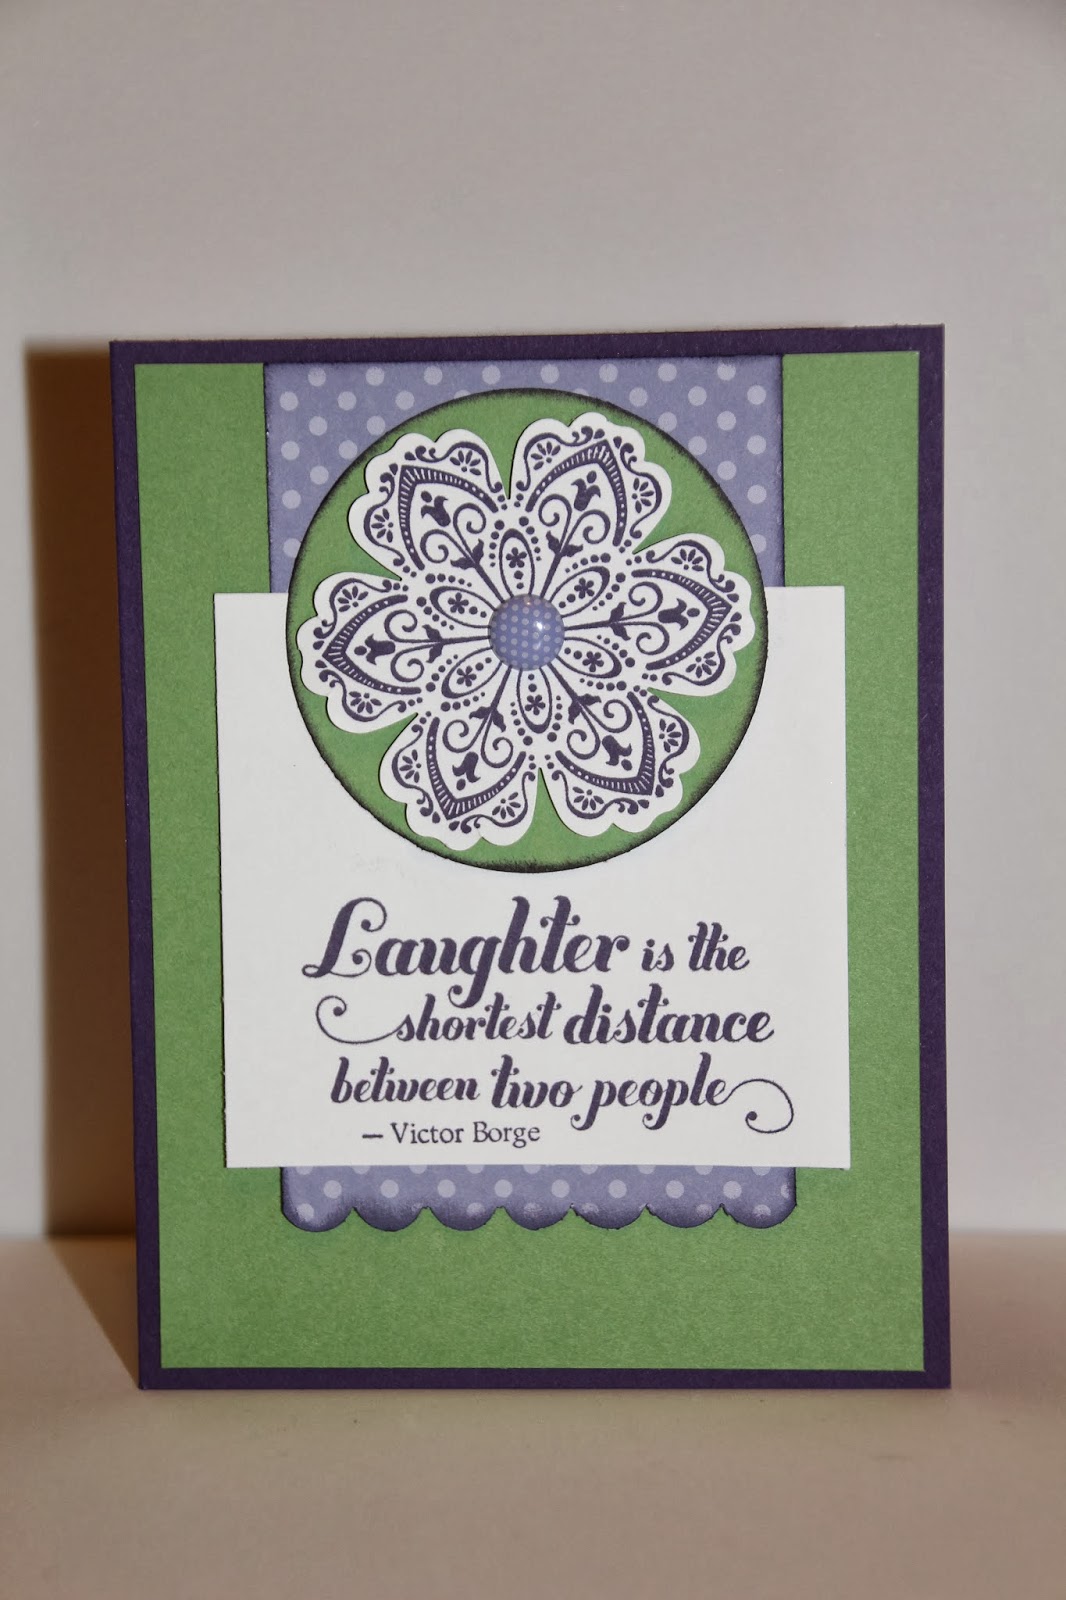
I used the colors Elegant Eggplant, Wisteria Wonder, and Wild Wasabi. My card base is Elegant Eggplant and then I layered Wild Wasabi over that for my card front. My center banner is Wisteria Wonder DSP and I added a scalloped edge with the border punch. I stamped my Mixed Bunch flower in Elegant Eggplant and then used a retired In Color Brad in Wisteria Wonder for the center. I wanted it to stand out a little more against the white so I layered a Wild Wasibu circle underneath... I think it was 2.5 inches. I pooped all that up with Stampin' Dimensionals. My sentiment comes from the very popular set Feel Goods. It really is a great set for those just because cards that you want to send to let someone know you are thinking about them. I did use a sponge dauber to go around the DSP and Wild Wasabu circle with Elegant Eggplant ink to add a little extra to the card and help set apart the layers a little more.
Sunday, February 23, 2014
Pleasant Poppies

I like using one large image and then cutting it into panels. I stamped Pleasant Poppies in Early Espresso and then colored the poppies with Blushing Bride and the stems with Pear Pizazz... a color combination I got from the Color Coach. After I had it all colored I cut the image and layered each section onto Pear Pizazz cardstock. I then layered those onto a large layer of Blushing Bride. Add a strip of Pear Pizazz ribbon and a Early Expresso button and you are almost done. I didn't want to leave my button bare so I trimmed a very thin strip of Pear Pizazz cardstock and threaded it though my botton holes.
I have an early day tomorrow so I am off to bed!
Friday, February 21, 2014
It's a Wonderful Life

I really love how this card turned out. I dug out a old In Color, Concord Crush, and used it as my card base. Yes, it is okay to dig out those retired colors and use them. I was actually quite surprised it did not make it into the color renovation and return. But, I hung onto mine so I am using it. I used the Papillon Potpourri butterflies and stamped 2 of each of the larger butterflies. I used Real Red, Pumpkin Pie, Wild Wasibi, Pacific Point, Concord Crush, and Daffodil Delight. I stamped them useing VersaMark and then punched them out with the coordinating punch. I was going for a happy kind of rainbow theme. For the Daffodil Delight butterfly you might notice some sparkle. I stamped it with VersaMark, then added Heat and Stick Powder, heated it again, and then added the Dazzling Diamonds glitter. It is so pretty!!
For my sentiment I used the Perfect Pennants set. I used my Stampin' Write markers becasue I wanted the sentiment to be in three different colors. I stamped it onto Whisper White card stock and punched it out with my Decorative Label punch. I punched a second Decorative Label punch out in Pumpkin Pie, cut it lengthwise and added it to either side. I popped it up along with my butterfly. To give your butterfly some added dimension, fold up his wings a little.
This card will be off to a friend of mine!
Ask my how you can get a free Sale-A-Bration item for every $50 that you spend before tax and shipping!!
Wednesday, February 19, 2014
Sending Good Thoughts Your Way

Now, onto my card. LeAnne, over at The Paper Players is celebrating her daughter's birthday this week and turned that into a challenge... to create a card with stars. You can see her post here. I really wasn't sure what I wanted to. Stampin' Up! retired their star stamp set, Seeing Stars, a few years ago and I have not purchased the new one they came out with last summer. I got my retired (or at least I think it is retired but any star punch would do) star punch out and still didn't know what to do. I decided to start with colors and choose Night of Navy and Daffodil Delight. Okay, now what? I still had Perfect Pennants on my desk that I used for the card I am going to share with you on Friday so I grabbed the 'sending good thoughts your way" sentiment since this card wasn't for a particualr occasion and I just decided I wanted a card I could send out just because. The sentiment seemed to fit. Then I got to looking at the striped pennant stamp and it all kind of came together from there. I stamped the sentiment in Night of Navy of to one side and then the striped pennant on the other side in Daffodil Delight. Then I added a punched out star out of Night of Navy. Even though I was trying to keep it clean and simple I still felt like it needed something. I decided to use one of the small stars from Seeing Stars, but you could easily use a star from the current set, and stamped it in Daffodil Delight. The thought of fussy cutting that star out almost made me pass out so I thought hey, just punch it out with a circle punch!! SO, my 3/4 inch circle punch might have just saved my life. I popped it on with a Stampin' Dimensional and then I had a cute, simple, all occasion card.
Monday, February 17, 2014
Thank You Zoo Review Style: Using a Mojo Monday Sketch

I really love the stamp set Zoo Review. I love the zoo and I am so lucky to have the wonderful Columbus Zoo and Aquarium practically right in my backyard! We are lucky to have Jack Hanna and we even got to meet him one day. He was filming a commercial when we went into one of the buildings and my girls walked right onto the set! He didn't mind at all and said it was fine for them to walk around. He even posed with my girls for a picture AND it was the one time I didn't have my camera so all I got was a not so good cell phone picture. It was back when cell phones didn't take good pictures so it was quite a few years ago.
Anyways, back to my card. I stamped my giraffe in Black Staz-On and then masked him off with a post-it note. Are you wondering what this means? Well, I stamped the giraffe on a post-it and then fussy cut around him. I then put the post-it note over the giraffe on my card stock. I used Inspired by Nature to stamp the grasses in Old Olive, Pear Pizazz, and Wild Wasabi. I then went back and filled it in with Old Olive and a sponge dauber. Then I created my sunset. I started at the bottom and used Daffodil Delight, next was Pumpkin Pie, and last at the top was Real Red all with sponge daubers. I got out my thank you stamp box and used the So Many Thanks to stamp my words. I stamped it on Pumpkin Pie and then punched it out with a 1 3/4 inch circle punch. I added some twine (I love that stuff!) and then a wooden button.
What do you think? I like how it turned out and can't wait to get it in the mail. I will put some extra postage on it since it has the button.
Sunday, February 16, 2014
Make a Wish with Perfect Pennants

I stamped the cupcake from Itty Bitty in each color a few times and then punched them out with the 1/2 inch circle punch. I then punched out the scalloped circles with the 7/8 inch scallop circle and mounted the cupcakes. I had my Old Olive ribbon from last years Occasions mini and it was the only Old Olive ribbon I could find! I guess I need to put some on my order list... or figure out where my other is! I stamped the make a wish from the new stamp set Perfect Pennants. This was my must have item from this year's Occasions catalog. I knew right away that I had to have it (and the matching framelits but I didn't use them on this card). My card base is Melon Mambo.
Ask me how you can get a FREE Sale-A-Bration item for every $50 you spend before tax and shipping!!
Shelly
Friday, February 14, 2014
Valentine Hand Santizer

I saved this for my last Valentine project that I am sharing because I just love it! It is a hand sanitizer. I got the pattern and instructions for the box from one of my favorite blogs, Scrap and Stamp with Frenchie and she even tells you how to easily make multiple boxes. I used the basic pattern for the box and came up with my own design for an owl. There are so many different owl ideas out there and I really can't give just one credit because I just kind of took what I had seen from memory and made my owl like I envisioned it.
I stayed with my Valentine color theme of Pool Party, Real Red, and Blushing Bride. Can you tell which punches I used? If I remember right it was the 3/4 inch circle, 1 inch circle, scallop border, full heart, the new triangle punch in the Occasions mini, and the retired trio hearts punch. I think that is it.
Ask me how you can get a free Sale-A-Bration item for every $50 you spend before tax and shipping!!
Happy Valentine's Day!
Shelly
Wednesday, February 12, 2014
Valentine Mouse Treat Holder
I am sticking with my color theme of Real Red and Blushing Bride for my Valentine projects. I saw this treat holder on Scrap and Stamp with Frenchie using the new scalloped tag topper and thought it was adorable. I did change it up slightly... I made mine big enough to hold three of the Ghirardelli squares instead of one and I think maybe I used Smoky Slate and she used Going Gray... but I could be wrong about the color. The length for mine was 8 inches and it was a perfect size for three squares. If you haven't tried either of the tag toppers you really should. They make creating a tag as easy as punch (lol- get it!).
I didn't want the chocolate falling out so I tied Pool Party ribbon around them and then used a glue dot to hold them in place. I had to work in my third color somehow so this was perfect.
 See you later:)
Shelly
I didn't want the chocolate falling out so I tied Pool Party ribbon around them and then used a glue dot to hold them in place. I had to work in my third color somehow so this was perfect.
Shelly
Monday, February 10, 2014
February 2014 Calendar

I have done through May as of today and some I did exactly like hers, other I changed the colors up, and some I just did my own thing. February is one that I did my own thing... maybe you recognize the design from my Valentine nugget box I posted last week. I basically took the same design and colors and used it for my calendar. I am making 5 sets of these... one for my, my mother-in-law, and one of my aunts (really my husband's aunt but I still claim her as mine too). My girls decided they wanted one of their own too so I am 'prepping' each month for them and then they are assembling it themselves.
I am looking forward to sharing the rest with you as I get them done and ready to post.
Ask me how you can get a free Sale-A-Bration item with every $50 you spend before tax and shipping!
Be sure to check back this week as I have a few more Valentine projects to share.
Shelly
Thursday, February 6, 2014
Hello Mojo Monday 331

I used the Kaleidoscope DSP and followed its color theme with Basic Black, Bermuda Bay, Crushed Curry, Strawberry Slush, and then I also added Smoky Slate. My sentiment is a basic "hello" from Pennant Parade and my ticket was stamped from That's the Ticket. I then used the ticket punch to punch it out. I used the new Triangle punch... and to get the different sized triangles I only inserted my paper part of the way to get the smaller ones. My must have from the Occasions catalog was the Banner Framelits Dies... they are AWESOME!! I cut my DSP using the largest size framelit.
Ask me how you can enjoy some free Sale-A-Bration products!!
Wednesday, February 5, 2014
Valentine Card

I did dig into my stash of Valentine themed stamp sets; I {Heart} Hearts, Filled with Love, P.S. I Love You, and Teeny Tiny Wishes... the most versatile and MUST have stamp set ever. The angel and small hearts were embossed using Pool Party Embossing Powder.
I did use a sketch challenge from Mojo Monday but it is a few weeks old.
Monday, February 3, 2014
Valentine Treat Box

I made this treat box for my daughter's teachers. I love how it turned out and it is perfect to use for Paper Players Theme Challenge this week. Anne Marie's theme was to create a Valentine card or 3-D item. The idea for the box is from Stamp & Scrap with Frenchie. She has a great video linked to help you make one of your own. I did a snowman themed one a few years ago and decided I wanted to do another this year. The box holds 10 Hershey Nuggets.
My colors are Pool Party, Real Red, and Blushing Bride. I used some DSP to add a layer to the top of the box and to cover the nuggets. My stamp sets were It's a Wrap Holidays, P.S. I Love You, and A Round Array. I think the first two are retired and it really is okay to mix new and old... it isn't like we don't all have stamps we already own and I don't want to feel like I can't use them... so I do! If you don't have It's a Wrap set you could easily cover those two nuggests with Whisper White cardstock and punch a heart from the Owl Builder punch to add on top. If you don't have P.S. I Love You how about stamping the Woodgrain Background stamp set on some Whisper White cardstock and then punch out a Full Heart.
Don't forget it is Sale-A-Bration! Ask me how I can help you get a FREE Sale-A-Bration item for EVERY $50 you spend before tax and shipping.
Sunday, February 2, 2014
Just Because Card

Over at Freshly Made Sketches, the key is to keep your card clean and simple, yet fresh. I don't know about you but I live in Ohio and I am so ready to see butterflies and know Spring is here so if I can't have Spring outside then it might as well be Spring in my craftroom. I did use a few retired sets on my card. I used Baroque Motifs and though you can't buy it you could recreate this care using the current stamp set Flowering Flourishes on page 118 of the Idea Book and Catalog. I also used the retired Sale-A-Bration stamp set Vintage Verses... I have never used it before!! You could pick any sentiment that fit the purpose for your card from all of Stampin' Up!'s current sets or look through your stash of stamps we all know you already own. I did use the Decorative Label punch (pg. 181), Bitty Butterfly and Elegant Butterfly punches (both pg. 183) and some of the Pearl Basic Jewels (pg. 171) to jazz the card up. Yes, there is some dimension on this card... my must have on almost every card is Stanpin' Dimensionals.
Don't forget Sale-A-Bration is going on. I am happy to help you place your order and get a free Sale-A-Bration item for EVERY $50 you spend before tax and shipping.
Subscribe to:
Posts (Atom)